How to Make Your First Trade on Coinbase: Step-by-Step Tutorial


Entering the cryptocurrency market often begins with a first trade on a centralized exchange, where the onboarding sequence can influence both risk exposure and user confidence. Coinbase is frequently chosen for its structured account flow and visible trade execution steps, yet it was observed that a lack of familiarity with verification, funding rails, and order types can lead to avoidable errors. This tutorial documents the typical sequence of actions required to complete a first trade on Coinbase, with attention to operational habits that reduce mistakes, such as small test transactions and careful review of preview screens. The goal is to provide you a technically precise roadmap that can be followed with minimal assumptions about prior experience.
1. Create and verify your Coinbase account
Account creation and verification are prerequisites to trading, as regulatory Know-Your-Customer (KYC) and anti-money-laundering protocols are enforced by the platform. A verified account is required before deposits, withdrawals, or trades can be executed.
The signup process begins with an email address and password. After email confirmation, personal details such as legal name, phone number, and country of residence are requested. Identity verification (typically a government-issued ID and sometimes proof of address) is usually required before trading is enabled, and delays can occur when document images are unclear or verification volumes are high. It was observed that these steps are generally completed within minutes but may extend to hours or days depending on jurisdiction and documentation quality.
How to sign up for a Coinbase account?
The signup interface is accessed via web or mobile. An email verification code is required, and a password must meet complexity requirements. A phone number is often requested for security verification.
Completing identity verification for security
A photo ID and sometimes a selfie are uploaded for identity confirmation. This step is typically mandatory before fiat deposits and trading permissions are granted, and it is designed to reduce fraud and comply with financial regulations.
2. Secure your Coinbase wallet and enable two-factor authentication
Security settings should be completed before any significant funds are deposited. The platform is designed to enforce stronger authentication for sensitive actions, and a robust security posture is generally recommended.
A strong, unique password is foundational, while two-factor authentication (2FA) provides an additional verification layer. 2FA is often required for actions such as adding payment methods or initiating withdrawals. Coinbase supports SMS-based codes, but authenticator-app (TOTP) methods are generally considered more resistant to interception. A distinction exists between Coinbase’s custodial exchange wallet (where Coinbase holds the private keys) and the standalone Coinbase Wallet app (self-custody with on-device key control). This difference matters because custodial wallets allow direct trading, while self-custody wallets provide greater sovereignty but require more careful key management.
Setting up a strong password and enabling 2FA
2FA can be enabled in security settings. An authenticator app is recommended, as SMS codes can be intercepted through SIM-swap attacks.
Understanding different wallet types on Coinbase
Custodial wallets allow direct trading and fiat access, while self-custody wallets are used for independent storage and DeFi interactions. The choice reflects a trade-off between convenience and sovereignty.
3. Deposit funds into your Coinbase account
Funds must be deposited before trades can be placed. Funding methods differ by region, and each method has distinct fees and settlement times.
Coinbase supports multiple payment methods, including bank transfers, credit/debit cards, and third-party services such as PayPal (availability varies by jurisdiction). Bank transfers typically have lower fees but longer settlement times (often 1–5 business days), while card deposits are usually instant but more expensive. It was observed that the platform typically provides a preview of fees and estimated settlement time before confirmation, which can be used to choose a method based on cost and urgency.
How to add a bank account, credit card, or PayPal
Payment methods are added in settings, and verification steps are required. Bank account verification often uses micro-deposits or instant verification, depending on the region.
Choosing the best funding method based on fees and processing time
A common trade-off is speed versus cost: instant methods enable quick market entry but carry higher fees, while bank transfers preserve capital but require patience. A small test deposit can be conducted to confirm that the selected method works correctly before larger transfers are attempted.
4. Navigate the Coinbase trading interface
Coinbase’s trading interface is layered: a simple buy/sell panel and an Advanced Trade view with additional order types and charting tools. Understanding these layers is essential for matching execution style to strategy.
The basic interface is oriented toward immediate executions at the prevailing price, while Advanced Trade provides limit and stop order types for more controlled execution. The difference is primarily one of control: market orders prioritize speed, while limit and stop orders prioritize price precision. This distinction is important because cryptocurrency prices can move quickly, and the execution price may differ from the displayed price in volatile conditions.
Understanding market, limit and stop orders
Market orders execute at the best available price, offering low control but high speed. Limit orders execute only at a specified price or better, offering medium control. Stop-limit orders require a trigger price and then execute as a limit order, offering higher control but greater complexity.
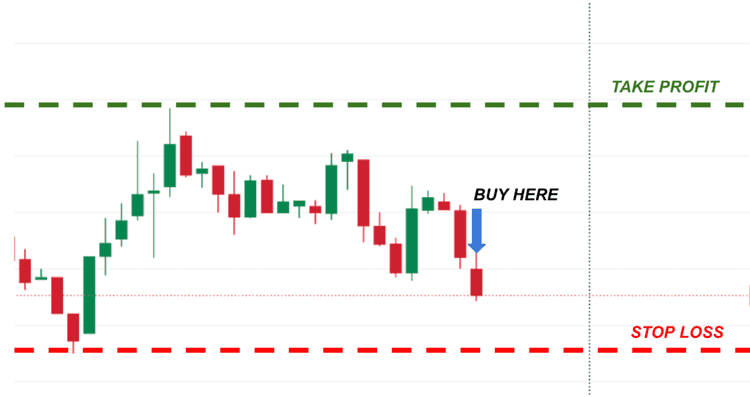
How to analyze price charts and trends before making a trade?
Charts in Advanced Trade display historical price action and can be used to assess volatility and trend direction. While not exhaustive, these charts can help confirm whether a trade aligns with the recent price structure and reduce the likelihood of entering during sharp, short-lived moves.
5. Place your first crypto trade on Coinbase
With funds available and the appropriate order type selected, trades are placed through the Buy/Sell or Trade screens. A preview is provided before confirmation, and this preview is the last opportunity to catch mistakes.
Trades are initiated by selecting an asset and entering an amount in fiat or crypto units. The summary screen shows fees, total cost, and the expected execution type. A small test trade is often recommended to confirm the workflow and to observe how fees and execution behave in real time.
How to buy cryptocurrency on Coinbase?
Selecting “Buy” prompts the asset selection and amount entry. The order summary shows fees and total cost. Confirmation completes the purchase, and the asset appears in the portfolio.
How to sell cryptocurrency funds securely?
Selling follows the same process in reverse: select “Sell,” enter the amount, review fees, and confirm. A preview screen is presented before execution, allowing confirmation of the destination (fiat wallet or another balance).
6. Track your trades and manage your crypto portfolio
After execution, portfolio tools display balances, performance metrics, and transaction history. These tools are useful for monitoring exposure and evaluating trade outcomes.
The portfolio view typically shows asset allocations and recent fills, while filters allow review by date or asset. Price alerts can be configured to notify when an asset crosses a set threshold, and recurring buys can be scheduled to implement dollar-cost averaging (a strategy that spreads purchases over time to reduce exposure to timing risk).
Using Coinbase portfolio tools to monitor your holdings
Balances and historical performance are shown in list and chart formats. Transaction history can be exported for tax or audit purposes.
Setting up price alerts and automated trading options
Price alerts can be set to trigger notifications when thresholds are crossed. Recurring buys can be scheduled to reduce the impact of short-term volatility on entry price.
Conclusion
The sequence from account creation to first trade on Coinbase involves discrete steps that are designed to verify identity, secure access, fund the account, and then execute trades with controlled parameters. Preview screens are consistently provided before confirmation, and these previews should be reviewed carefully to avoid unintended fees or incorrect amounts. As a practical heuristic, small test trades are recommended before committing larger amounts, and limit orders can be used when price control is important. This structured approach was found to reduce operational errors and increase confidence when entering the market.
Quick Reference Table: Coinbase Order Types
| Order Type | Executes When | Control Level | Typical Use | |||
|---|---|---|---|---|---|---|
| Market | Executes immediately at the best available price | Low | Fast entry or exit | |||
| Limit | Executes at a specified price or better | Medium | Precise price control | |||
| Stop-Limit | Trigger price is hit, then a limit order is placed | High | Risk management & protection |
Resources
Frequently asked questions
Check out most commonly asked questions, addressed based on community needs. Can't find what you are looking for?
Contact us, our friendly support helps!
How do I make a first purchase on Coinbase?
A first purchase on Coinbase is typically made after the account has been created, identity verification has been completed, and a payment method has been linked. Once funded, an asset can be selected from the Buy/Sell interface, where an order preview is rendered showing price, fees, and settlement method. The transaction is executed only after the preview has been confirmed, allowing errors or mismatches to be caught before funds are committed.
How do I start trading on Coinbase?
Trading on Coinbase generally begins once verification and funding steps have cleared, which may take from minutes to several days depending on jurisdiction and payment rail. Basic trades are placed through the standard Buy/Sell flow, while more precise control is available through Advanced Trade, where limit and stop orders (price-conditioned instructions) can be configured. A small initial trade is often conducted to validate settlement behavior before larger positions are entered.
How do you invest in crypto using Coinbase?
Crypto investment on Coinbase is most often initiated through spot purchases, where assets are bought at current or specified prices and held in the account wallet. For longer-term strategies, recurring buys can be scheduled at fixed intervals, implementing dollar-cost averaging (periodic purchases to reduce timing risk). Portfolio allocation and performance can then be reviewed through the built-in dashboard, where unrealized gains, cost basis, and asset distribution are rendered.