Troubleshooting Common MetaMask Issues: Tips for Smooth Crypto Transactions


MetaMask is one of the most widely used crypto wallets and Web3 gateways. It supports Ethereum and other EVM-compatible blockchains, enabling access to dApps, token swaps, DeFi protocols, and NFTs. However, MetaMask isn't without flaws. Users regularly encounter issues like stuck transactions, incorrect nonce values, and connection failures. In this comprehensive guide, we’ll walk you through technical solutions to the most common MetaMask problems. From gas fee errors to RPC mismatches and mobile glitches, this article ensures you can transact confidently and securely, especially if you're using multi-chain bridges and platforms like Rango Exchange.
Common Metamask errors and how to fix them
When MetaMask malfunctions, it’s often due to incorrect settings, blockchain congestion, or smart contract errors. Here’s how to diagnose and fix these issues.
Transaction stuck or pending
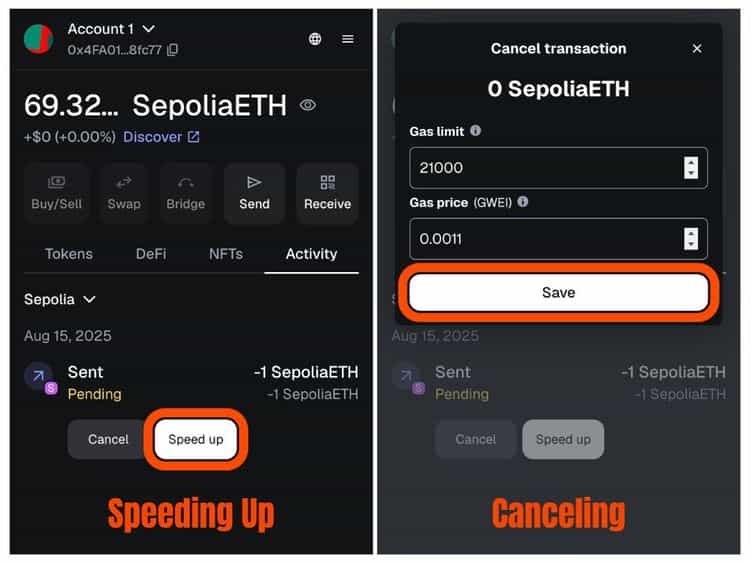
This often happens during peak network usage, especially on Ethereum. If gas fees are too low, miners deprioritize your transaction, leaving it pending indefinitely. You can resolve this by selecting “Speed Up” to resubmit the transaction with a higher gas fee. Alternatively, cancel the pending transaction by sending a new one with the same nonce but 0 ETH and higher gas. Use Etherscan Gas Tracker to set a competitive fee.
Insufficient funds error
This error appears when your wallet doesn't hold enough ETH to pay for gas, even if you're sending other tokens. Always keep a buffer of ETH in your wallet. Ensure that you’ve calculated for gas fees on both the sending and approval steps, especially in token swaps and dApps.
Invalid nonce error
MetaMask assigns each transaction a nonce. This term can have several meanings. It's a shortened form of "number only used once," and in this case, it refers to a 'transaction number,' starting with the first transaction made by the sender’s address. You could run into serious issues if, for example, you send two separate transactions from different instances of MetaMask using the same account address simultaneously. Your address's transactions must be processed in sequential order based on their nonce. However, while nonces can sometimes cause a transaction to get stuck, they can also be the solution to getting a transaction unstuck.
If this number becomes misaligned due to external tools or manual edits, you'll get an invalid nonce error. Enable "Customize transaction nonce" in MetaMask’s advanced settings.
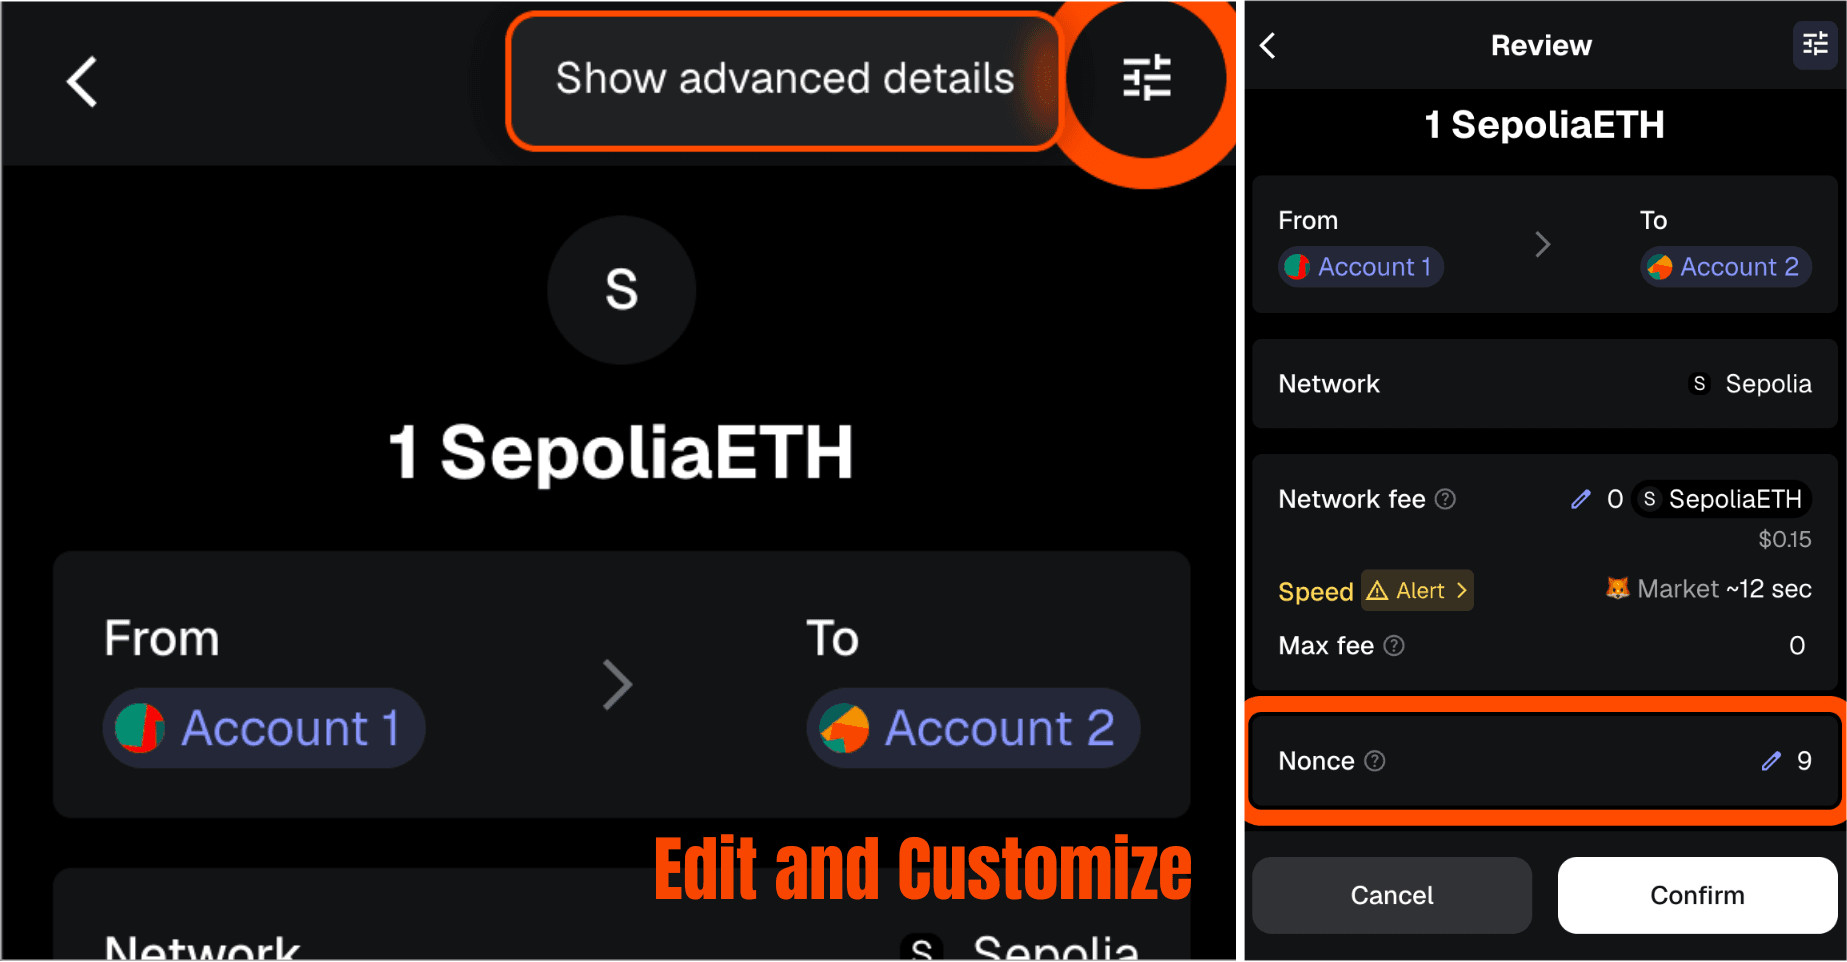
Then check your correct nonce on Etherscan and resend the transaction with it.
Failed transaction error
Failed transactions typically result from incorrect contract inputs or insufficient slippage settings in DeFi operations.
If your transaction fails, try retrying with adjusted settings. Slippage refers to the difference between the expected price and the actual price when your transaction is executed. It's important to set an appropriate slippage tolerance to avoid failures due to price fluctuations during the transaction.
In most cases, a slippage tolerance of 1-3% is recommended. If your slippage tolerance is too low, your transaction may not be processed, especially in volatile markets.
MetaMask typically offers two options for setting slippage: manual adjustment or automatic slippage. If you're manually setting slippage, try increasing it slightly to ensure a successful transaction.
Here are some steps to adjust slippage in MetaMask:
A higher slippage tolerance increases the chance of your transaction being processed, but be cautious not to set it too high to avoid unexpected price changes.
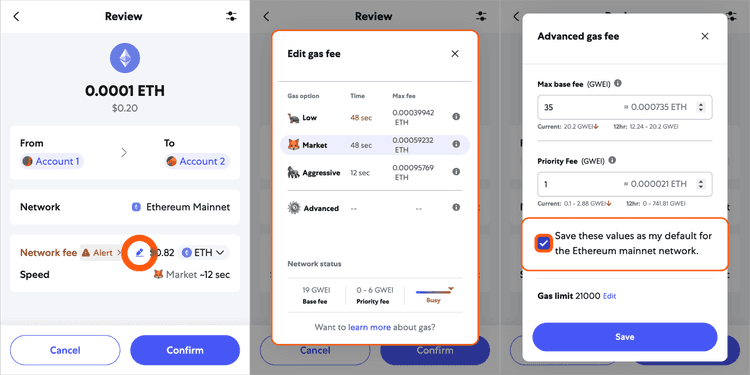
“Gas fee too low” issue
This message suggests your gas price is below the network’s required base fee.
To fix this, you’ll need to adjust both the Base Fee and Priority Fee. These are important components of your transaction gas price:
By increasing both the base fee and priority fee, you can ensure your transaction goes through smoothly.
Here’s how to adjust gas fees in MetaMask:
- Enable Advanced Gas Controls:
- Choose Your Gas Settings:
You’ll see three options: Low, Market, or Aggressive:
Select the one that best fits your needs based on transaction urgency.
- Click “Advanced” to further customize gas parameters:
- Save Your Settings (optional):
Important: If you’re unfamiliar with adjusting gas settings, it's best to use the Market option to avoid manual mistakes. However, if you need the transaction to go through quickly, Aggressive is a good choice.
“Contract interaction failed” error
This error is usually caused by incorrect network selection or attempting to interact with unsupported smart contracts.
To resolve it, double-check that your network is correct and that the contract address is verified.
How to verify a contract address:
- The official CoinMarketCap token page.
- The official project website.
- The project's verified Twitter account.
How to disconnect from a dApp: If you’ve connected to a potentially suspicious dApp or want to disconnect, you can do this directly within MetaMask. To disconnect, follow these steps:
- Open your MetaMask extension.
- Click on the three dots next to the account you're using.
- Select "Connected Sites" to view the dApps you've connected to.
- Click "Remove" to disconnect from any site.
For additional security, consider creating a new wallet without funds and using it to interact with dApps. This way, even if the dApp is compromised, your funds will be safe in the original wallet.
Why it's important:
This error serves as a critical warning and should not be ignored. Interacting with an incorrect contract address or network can lead to fund loss. Always double-check the contract details before proceeding with any transaction.
Connectivity and network issues in Metamask
Many MetaMask problems arise from faulty RPC endpoints, misconfigured networks, or data synchronization issues.
How to fix the "unable to connect to network" error?
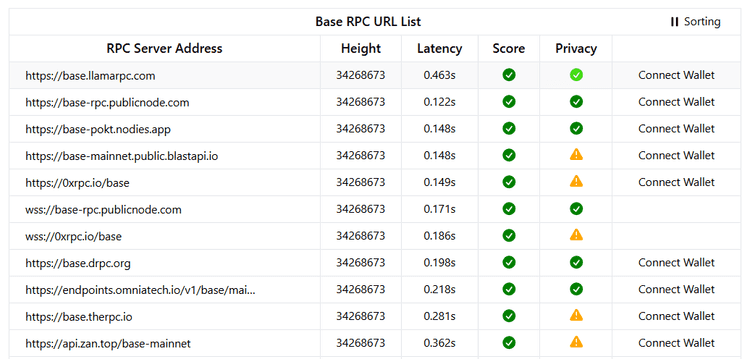
MetaMask fails to connect when the default RPC is overloaded or down. This is common on testnets or congested chains. Instead of manually switching to another RPC provider, the best and most reliable option is to use Chainlist to automatically add and switch to the correct network with verified RPCs. You can find RPCs that are optimized for both performance and privacy, ensuring a smoother connection experience.
To fix this error:
- Visit Chainlist.org.
- Search for your network (e.g., Ethereum, BSC, Polygon).
- Click "Add to MetaMask" for the correct RPC and network details.
Chainlist will ensure that you’re using an optimal RPC, reducing issues with syncing or connection.
Tip: When selecting an RPC, choose one that has a green checkmark for both score and privacy and the lowest latency. This ensures the best performance and security for your transactions.
RPC error: causes and solutions
RPC errors often occur when the endpoint exceeds rate limits or has invalid configuration values. Always verify your Chain ID, currency symbol, and RPC URL.
The best way to resolve RPC issues is to use public RPC endpoints from trusted services like Chainlist, Infura, or Ankr. Chainlist provides the most reliable and up-to-date RPCs for various blockchains. It’s always a better idea to pull RPC details from Chainlist as it gives you the most trustworthy, verified sources. If your RPC still fails, check for misconfigured settings or rate limit issues on the provider's website.
MetaMask is not syncing with the blockchain
If MetaMask doesn't show updated balances or transactions, it's likely due to a syncing problem. The simplest way to fix this is to:
- Switch to another network, then back again to force a refresh.
- Restart your browser or MetaMask to re-sync with the blockchain.
- If the issue persists, try testing a new RPC. This will help MetaMask to fully reconnect and sync your account with the latest data.
Adding and switching to the correct blockchain network
Many users confuse networks like Ethereum Mainnet, BSC, or Polygon, which can lead to failed transactions. To avoid this, the most reliable method is to use Chainlist to add networks automatically and ensure you're on the correct one.
- Go to Chainlist.org and search for the network you're trying to add (e.g., Ethereum Mainnet, Binance Smart Chain).
- Click “Add to MetaMask” for the correct network.
By using Chainlist, you ensure that the Chain ID and RPC URL are correctly matched, minimizing errors.
How to add custom networks like Binance Smart Chain (BSC) and Polygon
If you need to manually add networks such as Binance Smart Chain (BSC) or Polygon, follow these steps:
- Navigate to MetaMask Settings → Networks → Add Network.
- Enter the required details for the network you want to add. For example:
Binance Smart Chain
Polygon
While adding networks manually works, it’s easier and more reliable to use Chainlist to ensure the RPC URL and other details are correct.
Security concerns and account recovery in Metamask
Because MetaMask is self-custodial, security is critical. Compromised wallets and lost seed phrases are, unfortunately, common.
Recovering a lost Metamask wallet with seed phrase
If your browser is wiped or your device is lost, you can restore your wallet by selecting “Import using Secret Recovery Phrase.” Before attempting recovery, you can check your assets on Etherscan to confirm that they exist on the blockchain. Keep in mind that Etherscan only shows the assets on the blockchain and does not help with the recovery process. It’s simply a way to verify that your assets are still present before recovering your wallet.
However, it’s crucial to store your seed phrase securely.
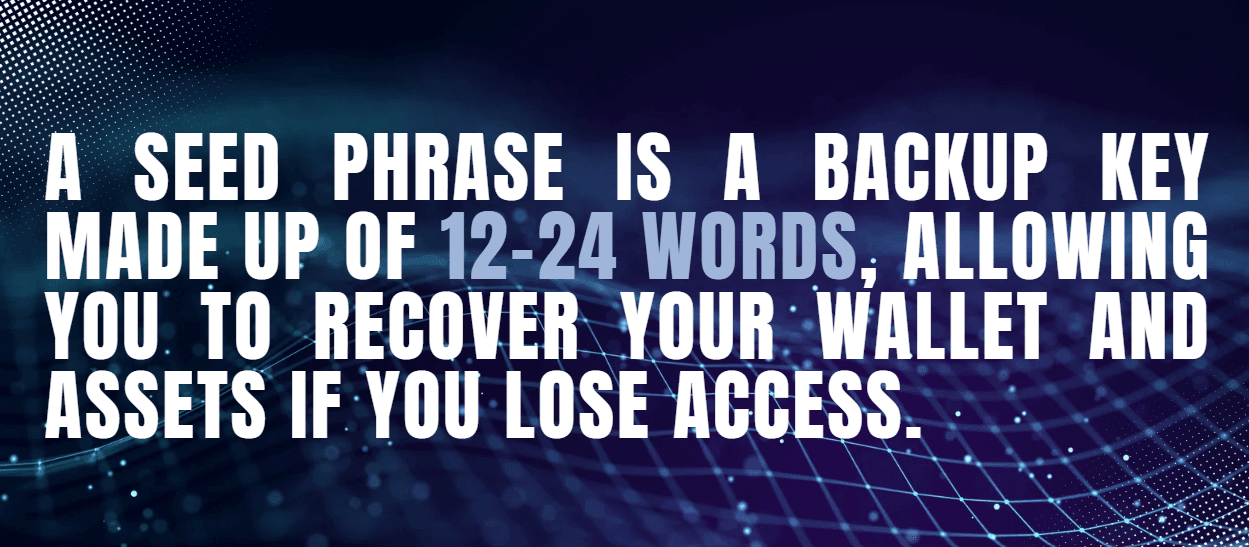 Keep it secure and private, anyone with it can control your funds. Always keep multiple copies of your seed phrase in different, safe locations, and ensure that it’s not easily accessible. Avoid storing it in places that can be easily compromised, such as digital notes, emails, or cloud storage. Also, never share your seed phrase with anyone. Even in trusted environments like Telegram or social media, sharing your seed phrase can expose you to hacks and theft. Consider using offline storage solutions like a hardware wallet or paper backup for added security.
How to reset Metamask without losing funds
MetaMask lets you reset your account without affecting your assets. This only clears the local transaction history, which can be helpful for troubleshooting or freeing up space.
It’s important to note the difference between resetting your account and resetting MetaMask:
So, resetting your account is useful for minor issues like transaction history clutter, but it won’t affect your assets.
Go to Settings → Advanced → Reset Account. This clears the local transaction history only.
Metamask account hacked: what to do immediately
Transfer funds to a new, secure wallet immediately. Revoke permissions using revoke.cash, this disables any unauthorized access given to dApps or contracts. Change all login credentials and avoid reusing compromised passwords.
Preventing phishing attacks and securing your wallet
Always access dApps from verified URLs. Enable MetaMask's anti-phishing protection, and never enter your seed phrase online.
Additionally, always read the message that appears in your wallet when signing a transaction. Make sure you understand what the transaction is for. If you're unsure, cancel the transaction and double-check the process.
Aside from verified URLs, ensure the dApp itself is trustworthy and legitimate.
Best practices for storing and backing up your seed phrase
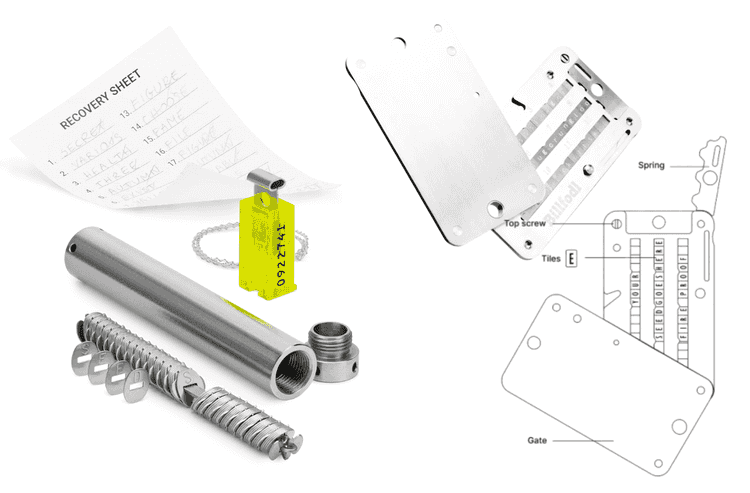
Use metal recovery tools like Cryptosteel or Billfodl. a solid steel case to store and protect your 12 to 24-word recovery phrase, designed to resist fire, water and more. Using character tiles, you recreate your recovery phrase in the steel unit, creating an almost indestructible back up. Store copies in separate physical locations to avoid single points of failure.
Browser and mobile-specific metamask problems
Some MetaMask issues are unique to browsers or mobile devices due to permission, extension, or app-related problems.
MetaMask Extension Not Working in Chrome or Firefox
Additionally, if you’re unable to see any errors, go to chrome://extensions, find MetaMask, and click Details. There, enable the "Collect errors" option to allow MetaMask to capture and display errors, which can help with troubleshooting.
MetaMask Not Opening in Brave Browser
MetaMask Mobile App Issues
Metamask and decentralized finance (DeFi) troubleshooting
DeFi transactions require high accuracy and network compatibility. Here's how to fix common issues.
How to manage multiple accounts in Metamask efficiently
Managing multiple accounts in MetaMask can be simple and effective with a few best practices:
-
Create and Label Accounts: MetaMask allows you to create multiple accounts within one wallet. To keep things organized, label each account based on its purpose (e.g., "Savings," "Trading," "Testing").
-
Export and Backup Accounts Using JSON: You can export your account’s JSON file to safely back it up. This file contains essential account data, allowing you to restore or transfer assets if needed.
-
Switching Between Accounts: Easily switch between accounts by clicking on the account icon in MetaMask and selecting the desired account. This helps streamline transactions and interactions with different dApps.
-
Use Custom RPC Networks for Different Accounts: If managing multiple networks, you can configure Custom RPCs for different accounts. This enables seamless interactions with different blockchains, helping you manage funds across various networks like Ethereum, Polygon, or Binance Smart Chain.
By following these tips, you can efficiently manage multiple accounts in MetaMask without confusion, ensuring your assets stay organized and easily accessible.
Best Practices for using Metamask with decentralized applications(dApps)
When using MetaMask with dApps, follow these best practices:
- Verify dApp authenticity: Always ensure that the website you’re connecting to is legitimate and secure.
- Read and understand transaction details: Double-check what you’re signing within MetaMask before confirming transactions.
- Use a separate wallet for testing: For security, create and use a separate wallet with minimal funds when interacting with unfamiliar dApps.
- Enable Anti-Phishing Protection: MetaMask has built-in phishing detection, so enable this feature to minimize the risk of being tricked by fake dApps.
Why is Metamask not connecting to Uniswap or other dApps?
If MetaMask is not connecting to Uniswap or other dApps, follow these troubleshooting steps:
- Clear Cookies and Cache as a Last Resort: MetaMask does not handle cookies and cache, so clearing your browser’s cookies and cache might be necessary. Perform a hard refresh (Ctrl + F5 or Cmd + Shift + R) after clearing to ensure the page reloads correctly. However, be aware that clearing cookies will delete other saved data, such as login credentials, so use this step only after trying other solutions.
- Try a Different Browser: Before clearing cache, test connecting to the dApp in a different browser. This can help determine if the issue is browser-specific without affecting your saved data.
- Ensure MetaMask is Active: If you have multiple wallets installed, ensure that MetaMask is the active wallet and not overridden by another extension or wallet.
- Check Network Settings: Make sure you're connected to the correct network (e.g., Ethereum, Arbitrum, base, Solana, TON, Cosmos) when using dApps. If you’re on the wrong network, the dApp might not work as expected.
Troubleshooting staking and farming issues in DeFi platforms
To resolve staking and farming issues in DeFi:
- Update Gas Limit: If the gas limit is too low, your transaction might fail. Increase the gas limit in MetaMask settings to ensure smoother execution of complex DeFi transactions.
- Check Token Approval: Before staking, make sure the tokens are approved for staking. If they aren’t, you need to give the DeFi contract permission to access your tokens.
- Check Project Website for Contract Updates: Always verify that you’re interacting with the latest and most legitimate contract address for staking. Visit the official project website or dApp to confirm the current contract details.
- Staking Eligibility: Ensure the tokens you wish to stake are compatible with the platform’s staking contract and that your wallet has enough funds to cover any transaction fees.
Solving liquidity pool errors in Metamask
If you’re facing liquidity pool (LP) errors, here’s how to troubleshoot:
-
Check Token Approval: Ensure that the tokens you are adding to the liquidity pool are approved. If they aren’t, you must approve them in MetaMask before proceeding.
-
Verify LP Health: Check the liquidity pool’s status on the official platform or dApp website. Ensure the pool is healthy and active.
-
Confirm Token Compatibility: Some tokens may not be supported in certain pools. Always confirm that the tokens you’re adding are compatible with the specific liquidity pool contract.
-
Network Compatibility: Ensure you’re on the correct network (e.g., Ethereum Mainnet, Binance Smart Chain) for the liquidity pool you’re interacting with.
Advanced metamask settings and developer mode
Unlock powerful settings to expand functionality and connect with hardware wallets.
How to enable developer mode in Metamask
Enable this in Settings → Advanced → Developer Mode. Use this to inspect console logs or troubleshoot deeply.
Using Metamask with hardware wallets like Ledger and Trezor
To use your hardware wallet (e.g., Ledger or Trezor) with MetaMask, follow these steps:
- Go to the account icon in MetaMask and select "Add Account" or "Connect Hardware Wallet".
- Follow the prompts for USB or Bluetooth integration, depending on your hardware wallet.
Benefits of Using a Hardware Wallet: A hardware wallet provides an extra layer of security for your funds. Since private keys are stored offline, it minimizes the risk of online hacks. MetaMask allows you to interact with dApps and sign transactions without exposing your private key to your computer or the internet.
For added security, pairing your hardware wallet with MetaMask ensures that your seed phrase (the backup key for recovery) stays offline and protected. The seed phrase of your hardware wallet should be stored securely, ideally in an offline and safe location, separate from your device.
Important Note: Always ensure that your hardware wallet is securely backed up and that you store both the hardware wallet and its seed phrase in a safe, separate place. Do not share or expose your seed phrase to anyone to avoid potential theft.
Exporting and importing Metamask accounts securely
To back up your MetaMask wallet, you can either export your private key or export your JSON backup. Both methods allow you to restore your wallet if needed, but it’s crucial to keep this information secure and offline to prevent unauthorized access.
Exporting via JSON Backup
This method involves backing up your wallet’s JSON file, which contains essential account data and allows you to restore your wallet on any device.
- Open MetaMask and click on the account icon.
- Select "Export Private Key" for a specific account or “Backup Phrase” to back up your entire wallet.
- Save the JSON file securely in an encrypted USB or secure vault. This file is essential for restoring your wallet.
Exporting via Private Key
This method allows you to export the private key for your wallet, which grants full access to your funds. This option is more direct and gives you the ability to restore the wallet on another device
- Open MetaMask and click on the account icon.
- Select "Account Details" and click on “Export Private Key”.
- Enter your MetaMask password to reveal the private key.
- Copy the private key and store it securely offline, ideally in encrypted USBs or a secure vault.
Important Note: Both the private key and JSON backup provide full access to your wallet. If either is exposed or stolen, your funds are at risk. Always store them securely offline, and never keep them in digital formats without encryption.
Final tips for a hassle-free metamask experience
Resources
MetaMask Official Support & Features
MetaMask – Resend Transactions
MetaMask – Restore Wallet Using Seed Phrase
MetaMask – Hardware Wallet Integration
MetaMask – Add Custom Networks
Blockchain Tools & Analytics
DeBank – Wallet & DeFi Portfolio Tracker
RPC & Web3 Infrastructure Providers
Chainstack – Web3 Infrastructure Platform
Security, Approvals & Phishing Protection
Revoke.cash – Revoke dApp Approvals
Wallet Guard – Protect MetaMask from Phishing
Cryptosteel – Metal Seed Backup Tool
Billfodl – Secure Backup for Seed Phrases
Frequently asked questions
Check out most commonly asked questions, addressed based on community needs. Can't find what you are looking for?
Contact us, our friendly support helps!
How do I cancel a pending MetaMask transaction manually?
Send a 0 ETH transaction with the same nonce and higher gas fee to overwrite it.
What causes "RPC Error" in MetaMask, and how do I solve it?
"RPC Error" in MetaMask usually occurs due to overloaded RPC endpoints or incorrect Chain IDs.
Solutions:
Is there a safe way to recover MetaMask without losing tokens?
Yes, using your Secret Recovery Phrase. Import it into a new installation to regain full wallet access.